

Your Everyday Health Pot
A smart, all-in-one solution to simplify Indian cooking. Designed to deliver taste, convenience, and nutrition, every single day.
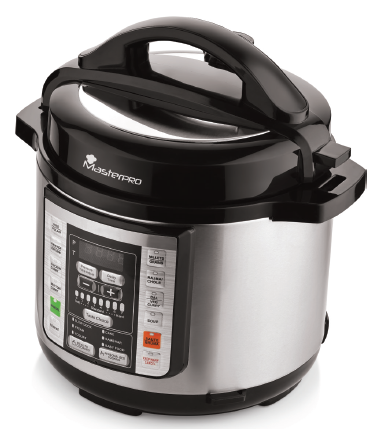
The MasterPro by Bergner MultiCook is more than just an appliance it’s your everyday partner in making healthy, home-cooked meals effortlessly.
With 18 intelligent pre-set functions tailored for Indian kitchens, it lets you prepare everything from khichdi to biryani, dal to rajma, soups to slow-cooked curries, all at the press of a button. The compact 3.0L design is perfect for small families, working professionals, and anyone who wants to cook smarter, faster, and healthier.
Its gentle cooking at approx. 110°C helps retain nutrients and flavour, while the digital interface ensures consistent results, every single time. Whether you’re a beginner or a seasoned cook, MasterPro takes the pressure out of pressure cooking.
Your Everyday Health Pot
A smart, all-in-one solution to simplify Indian cooking. Designed to deliver taste, convenience, and nutrition, every single day.
The MasterPro by Bergner MultiCook is more than just an appliance it’s your everyday partner in making healthy, home-cooked meals effortlessly.
With 18 intelligent pre-set functions tailored for Indian kitchens, it lets you prepare everything from khichdi to biryani, dal to rajma, soups to slow-cooked curries, all at the press of a button. The compact 3.0L design is perfect for small families, working professionals, and anyone who wants to cook smarter, faster, and healthier.
Its gentle cooking at approx. 110°C helps retain nutrients and flavour, while the digital interface ensures consistent results, every single time. Whether you’re a beginner or a seasoned cook, MasterPro takes the pressure out of pressure cooking.
TECHNICAL SPECIFICATIONS
- Power: 750W
- Capacity: 3.0L
- Voltage: 230V ~ 50Hz
- Temperature: Approx. 110°C for pressure cooking
WHAT’S IN THE BOX
Your MasterPro MultiCook package includes everything you need to get started right away:
1.Main Cooker Unit (Base) – The outer body with intelligent control panel
2. 3.0L Inner Cooking Pot – Non-stick cook pot for even heat distribution
3.Lid with Locking Mechanism – For pressure cooking and safety
4.Measuring Cup – For grains, pulses, and water
5.Serving Spoon – Non-stick compatible spoon for easy stirring and serving
6.Power Cord – Detachable, easy to store
PARTS OVERVIEW
Here’s a simple visual guide to the key components of your MasterPro MultiCook. Knowing these parts will help you assemble, use, and clean the unit safely and effectively.
GENERAL VIEW OF THE SAFETY COMPONENTS
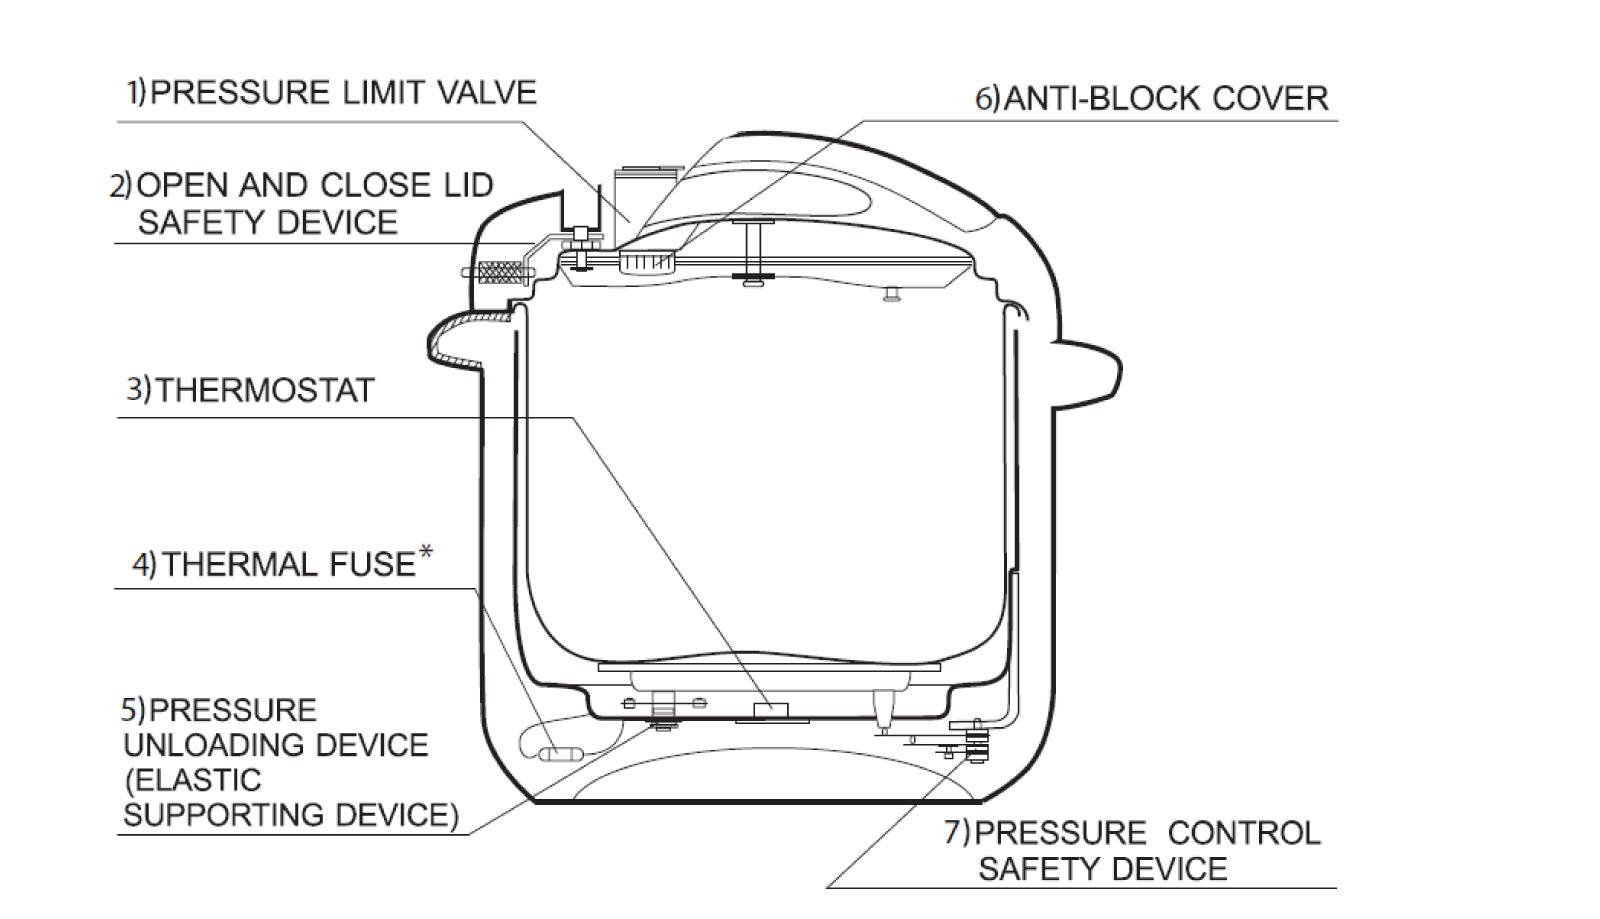
* THERMAL FUSE - It automatically shuts off the circuit when the appliance reaches its maximum temperature.
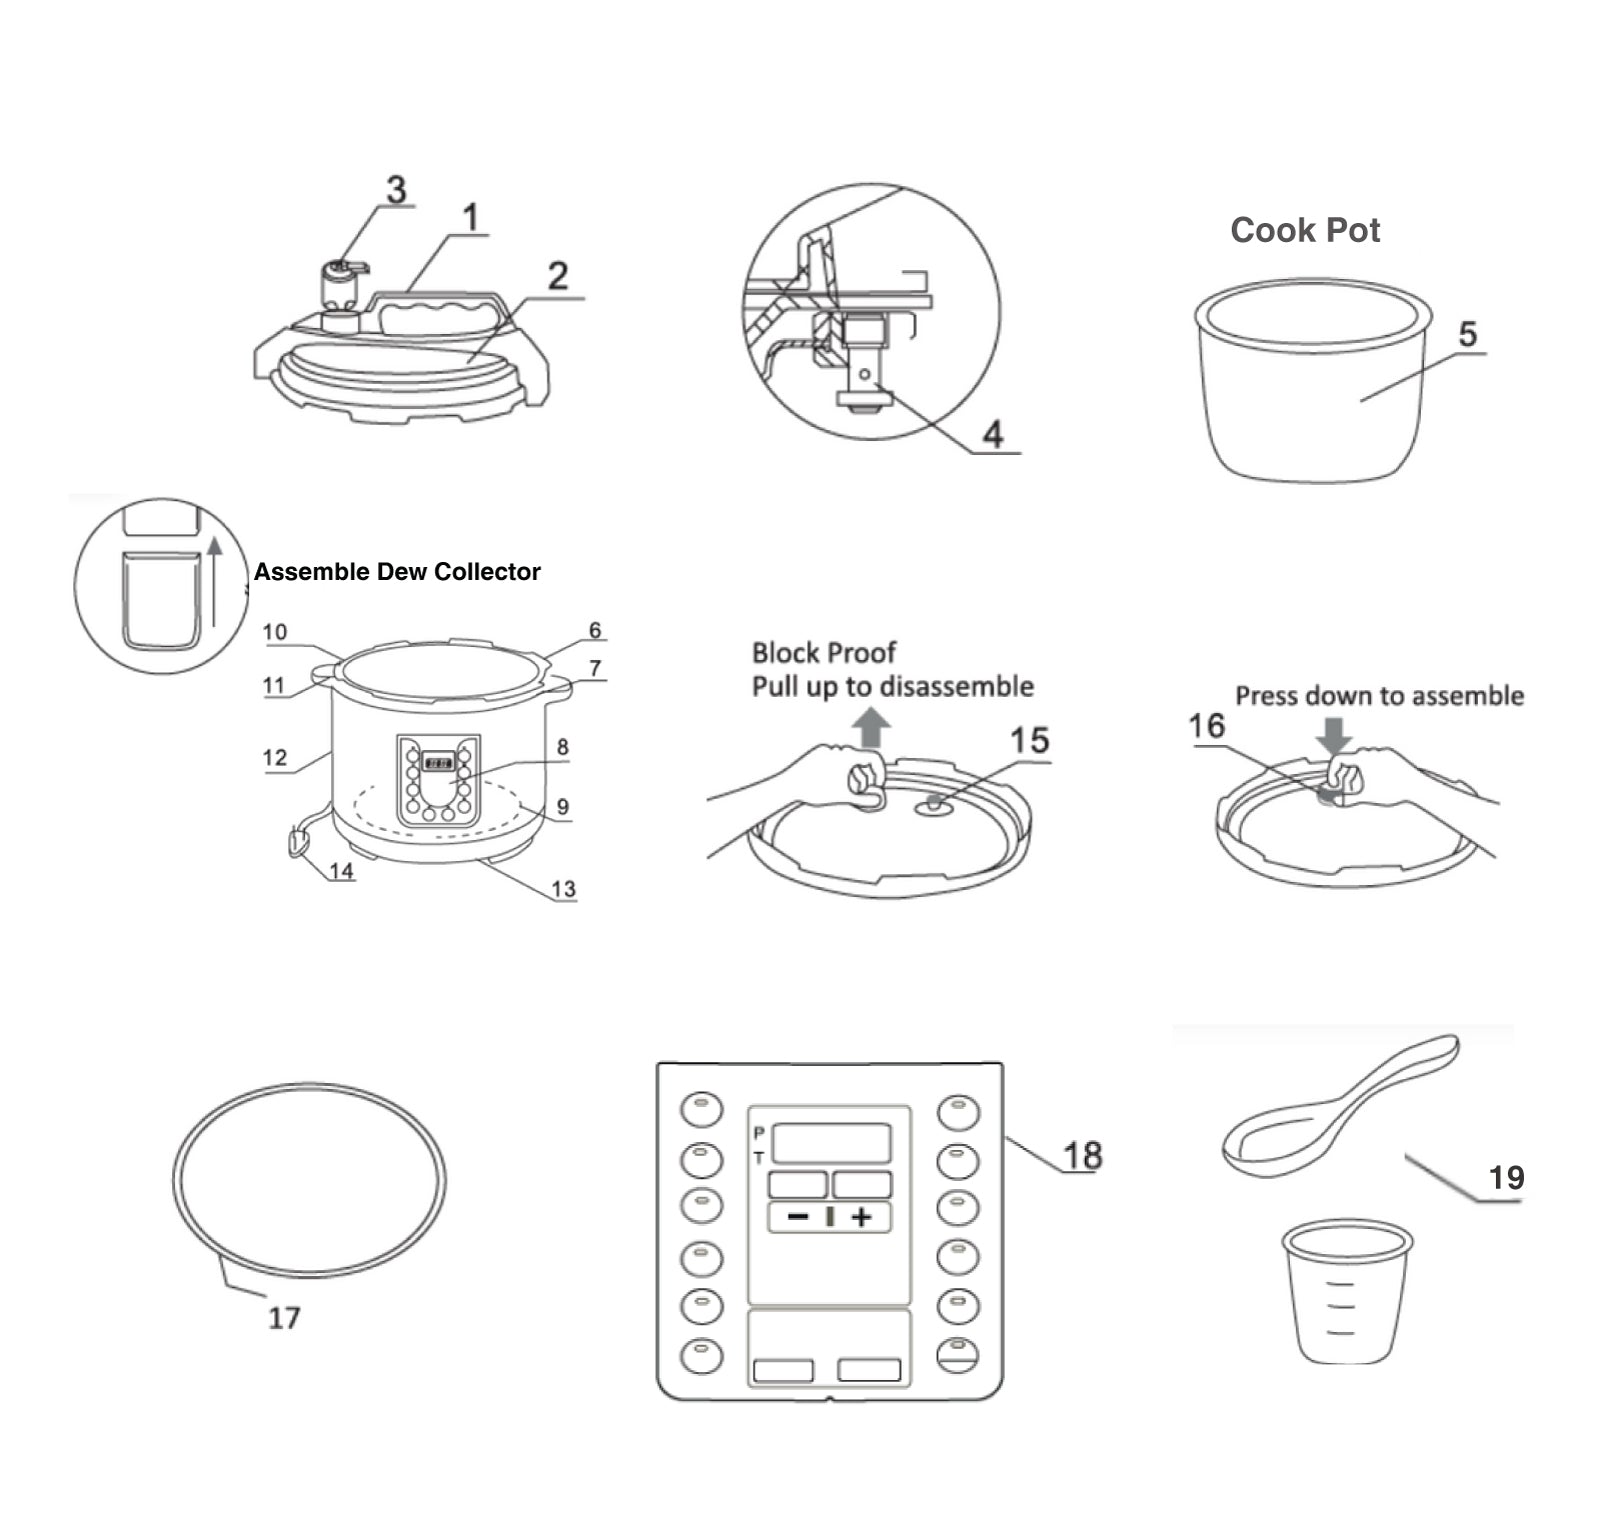
1.Lid Handle
2.Steel Lid
3.Pressure Limit Valve
4.Float valve
5.Cook Pot
6.Fixed Metal Pot
7.Middle Ring
8.Switch Control Panel
9.Heating Plate
10.Dew Collector
11.Side Handle with lid slot
12.Outer Body
13.Base
14.Power Cord
15.Float Valve Seal
16.Anti-block Cover
17.Sealing Ring / Gasket
18.Time Display
19.Measuring Cup and Spoon
CONTROL PANEL OVERVIEW
The MasterPro MultiCook comes with a smart, easy-to-use digital control panel. Each button is pre programmed for specific dishes, so you get consistent results every time — no need to guess temperature or timing.
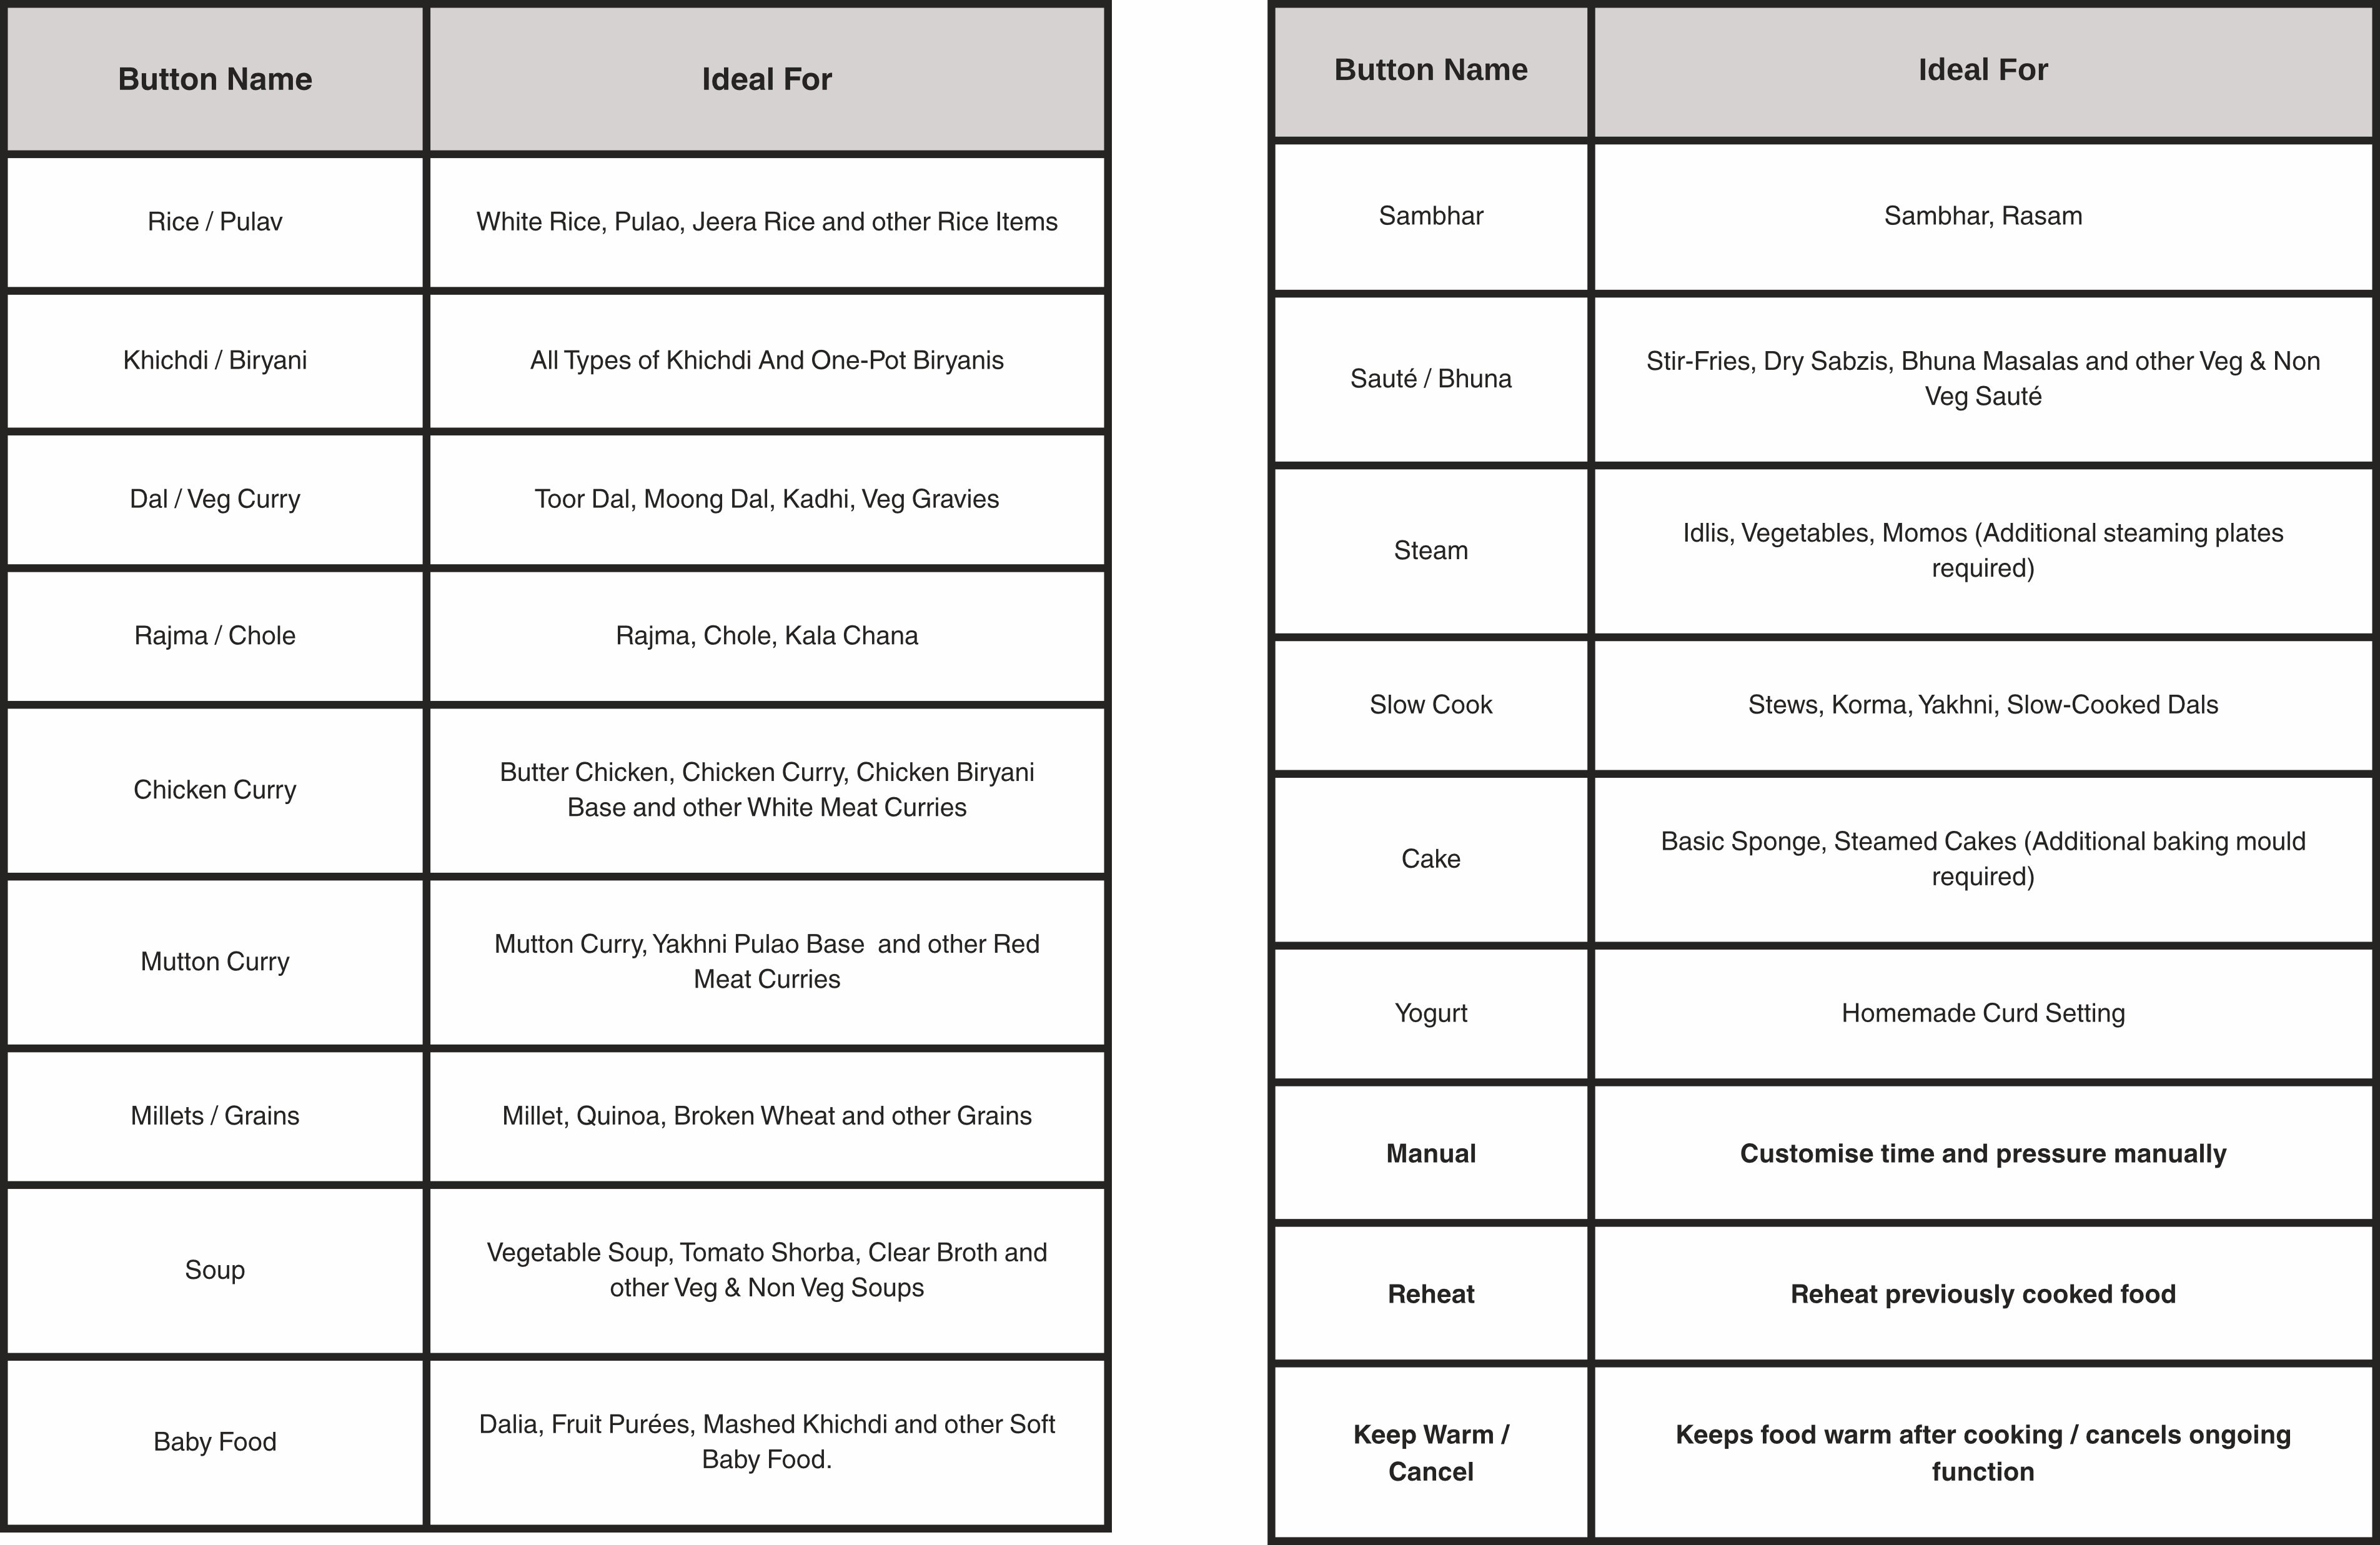
18 COOKING PRESETS
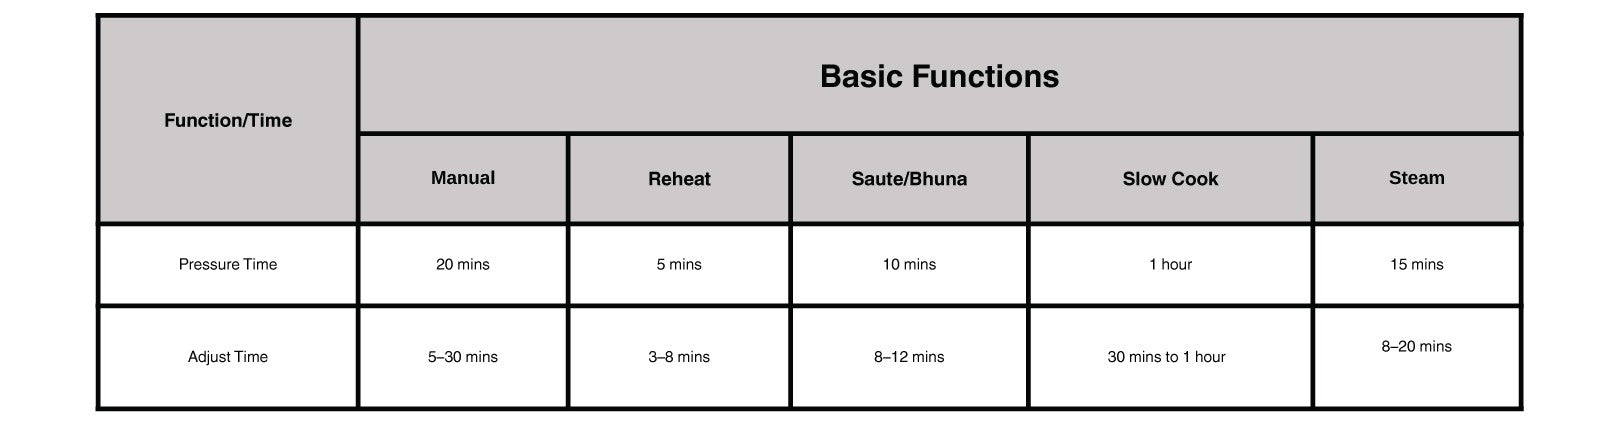
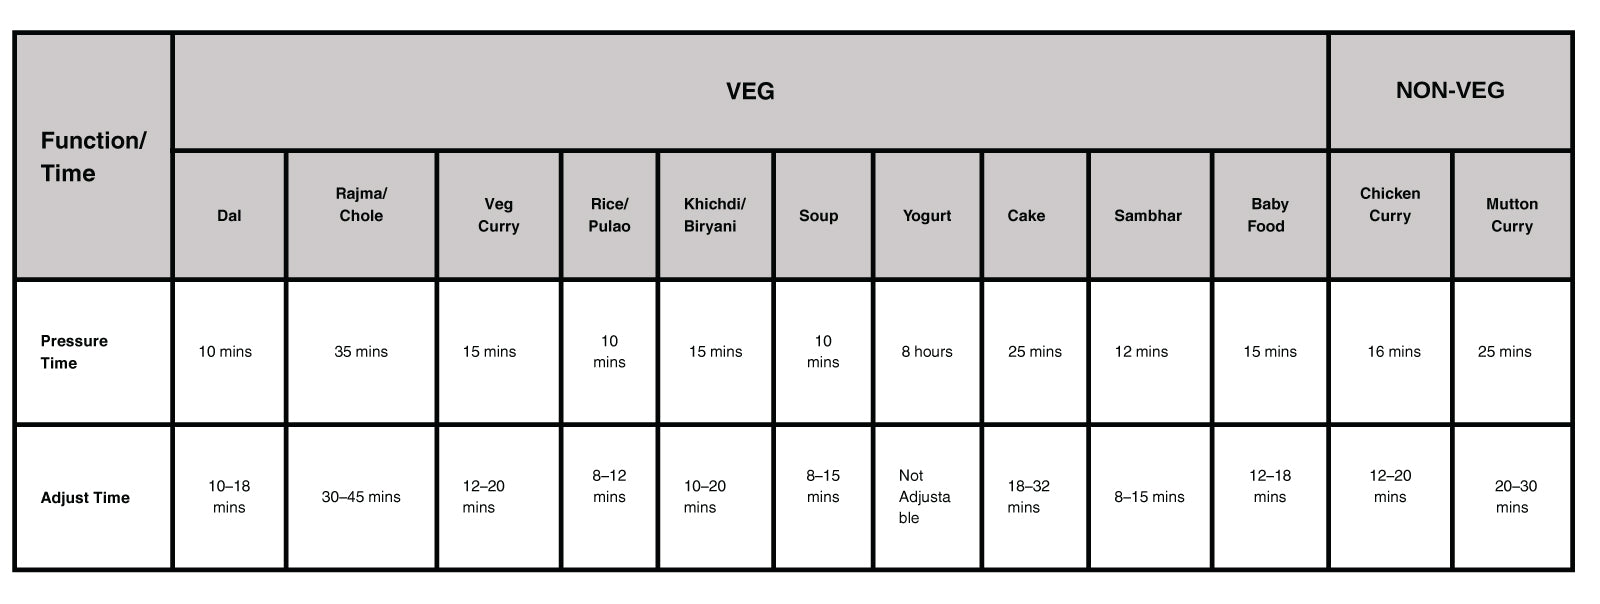
FUNCTION & TIME GUIDE
VEGETARIAN & NON-VEGETARIAN PRESETS
HOW TO USE YOUR MASTERPRO MULTICOOK
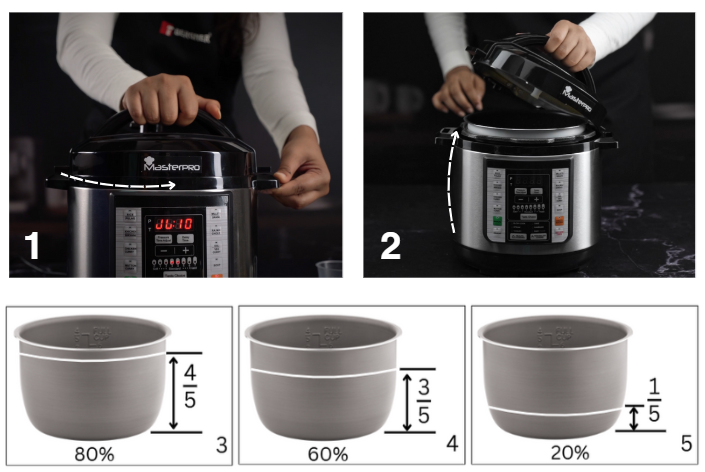
A. Open the Lid: Hold the lid handle, turn it
clockwise, and lift. (See pictures 1 & 2)
B. Add Ingredients: Remove the cook pot, add your ingredients and water.
- Do not fill more than 80% of the pot’s height.
- For soaked foods (like rice, dal), fill only up to 60%.
- Minimum fill should be at least 20%. (See pictures 3 to 5)
C. Clean & Insert Pot: Clean and dry the cook pot. Wipe the heating plate dry. Then place the cook pot into the outer body.
D. Check the Seal Ring: Ensure the seal ring is fitted properly inside the lid. Turn it both ways to secure it.
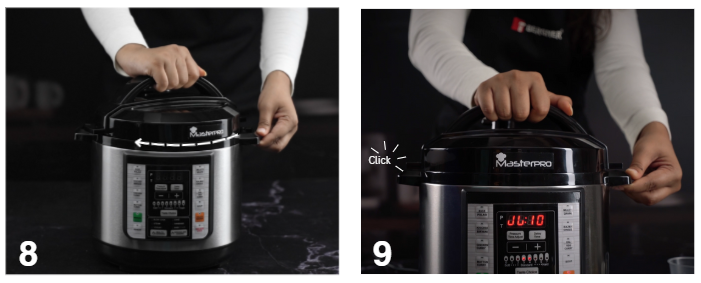
E. Lock the Lid: Align the lid and turn it
counter-clockwise until it clicks into the lock position. (See pictures 8 & 9)
C. Clean & Insert Pot: Clean and dry the cook pot. Wipe the heating plate dry. Then place the cook pot into the outer body.
D. Check the Seal Ring: Ensure the seal ring is fitted properly inside the lid. Turn it both ways to secure it.
E. Lock the Lid: Align the lid and turn it
counter-clockwise until it clicks into the lock position. (See pictures 8 & 9)
F. Install Pressure Valve: Attach the pressure limit valve. (See pictures 10a) Confirm the float is down before cooking. (See pictures 10)
G. Power On: Plug in the cord securely to avoid accidents. The control panel will light up.
H. Select a Cooking Function: Press any of the 18 preset buttons as per your recipe. The cooker will start
automatically after a few seconds.
I. Cooking Begins: Pressure will build first, once reached, the cooking timer will begin. The lid must remain locked during this time.
J. After Cooking: Once done, the unit will beep and switch to Keep Warm mode (bb). Allow natural pressure release, or carefully turn the pressure valve for quick release.
K. Smart Lid Rest: The lid can be safely opened once the float valve drops. Simply place it on the lid holder slot, any extra steam or water drips and collects into the dew collector, keeping your kitchen clean and mess-free.
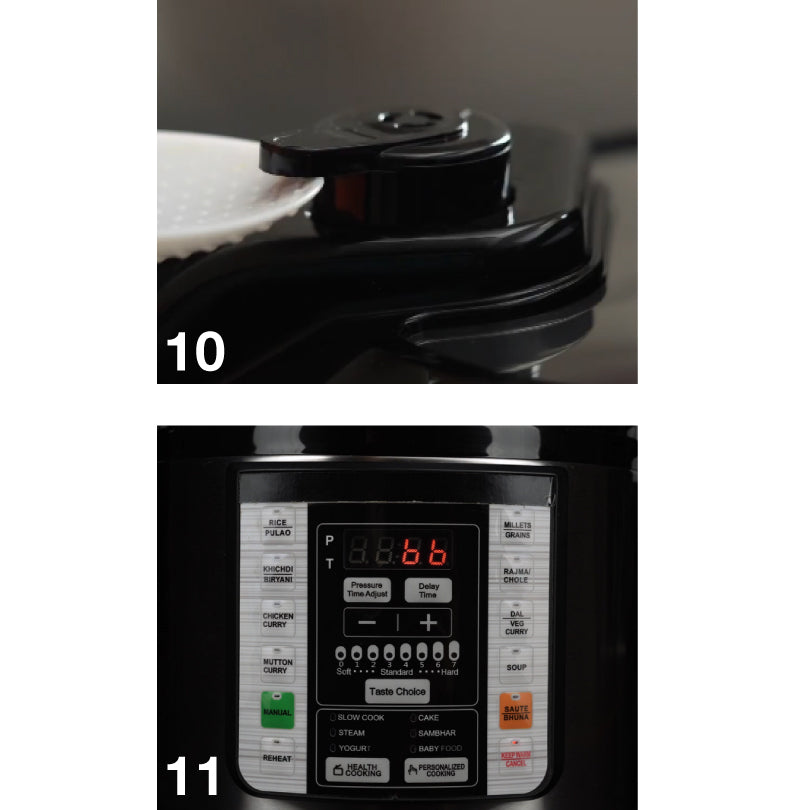
CLEANING & MAINTENANCE
- Always unplug the cooker before cleaning.
- Wipe the outer body with a soft, dry or damp cloth. Do not immerse the main unit in water or run it under a tap.
- Wash the inner pot, lid, and accessories using warm water and a mild detergent. Use a soft sponge or brush to avoid scratching the non-stick surface.
- Dry all components thoroughly before reassembling.
IMPORTANT DO’S & DON’TS
✅ Do’s:
- Fill between 20% and 80%, even when cleaning.
- Keep the anti-block cover, pressure valve, and float valve clean.
- Wait for the float valve to drop completely before opening the lid.
- Use only silicone or wooden spatulas to protect the non-stick surface.
- Keep the outside of the pot and the heating plate clean and dry.
- Use the side handles to lift the unit, not the lid handle.
- Contact Bergner customer care for replacements or repairs.
❌ Don’ts:
- Don’t fill above the limit (over 80%) or below 20%.
- Don’t damage or replace the seal ring with non-original parts.
- Don’t put anything on the pressure valve or try to change it.
- Don’t cover the lid or pot rim with cloth or foil.
- Don’t touch the lid or steam valve during or right after cooking, they’ll be hot.
- Don’t let children go near the unit while it's in use or still hot.
- Don’t lift the unit using the lid handle.
Don’t use the unit if the power cord is damaged, contact customer care.
SMART SETTINGS
Your MasterPro MultiCook gives you more than just presets.These three smart functions help you customise your cooking experience further:
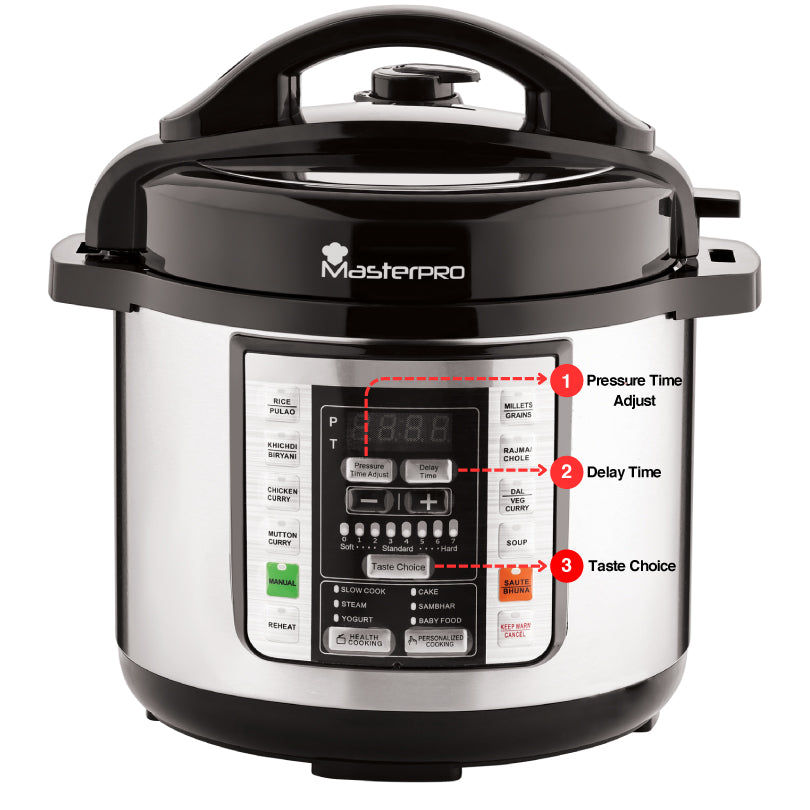
1. Pressure Time
This is the actual cooking time under pressure, once
the cooker reaches full pressure.
1. You can adjust this using the “+” and “–” buttons for most presets.
2. During this time, the lid remains locked and cannot be opened.
3. Once the time is complete, the unit beeps and
switches to Keep Warm mode (bb).
2. Delay Timer
Start cooking at your convenience.
Press the Delay Time button.
Use the “+” and “–” buttons to set how many hours/minutes later you
want the cooking to begin.
You can delay the start from 30 minutes to 24 hours.
Example: Setting it to “2:00” means cooking will start
after 2 hours.
⚠️ Not available in: Keep Warm, Sauté,Yogurt, Cake, or
Manual modes.
✅ Use only for ingredients safe at room temperature
(e.g., rice, dal, grains).
3. Taste Choice (Texture Control)
Select how soft or firm you'd like your food to be perfect for rice, dals,
and curries.
Choose between:
Soft – Longer cooking for a softer texture
Standard – Default timing
Hard – Shorter cooking for a firmer bite
✳️ This option is only available on selected presets and will
be disabled for others automatically.
SAFETY FEATURES & WARNINGS
✅ Built-in Safety
- Lid Lock – Locks during pressure cooking and opens only after pressure drops.
- Float Valve – Prevents lid opening while pressure is active.
- Pressure Valve – Releases extra pressure automatically.
- Anti-block Cover – Blocks food from clogging steam vents.
- Thermal Fuse & Dry Heat Protection – Prevents overheating or dry cooking.
⚠️ Safety Tips
- Never force open the lid under pressure. Wait for the float valve to drop.
- Don’t cover the lid or pressure valve with cloth or foil.
- Use only the side handles to lift the unit.
- Keep children away during and after cooking.
- If the unit shows unusual sounds, smells, or error codes, unplug and contact Bergner customer care.
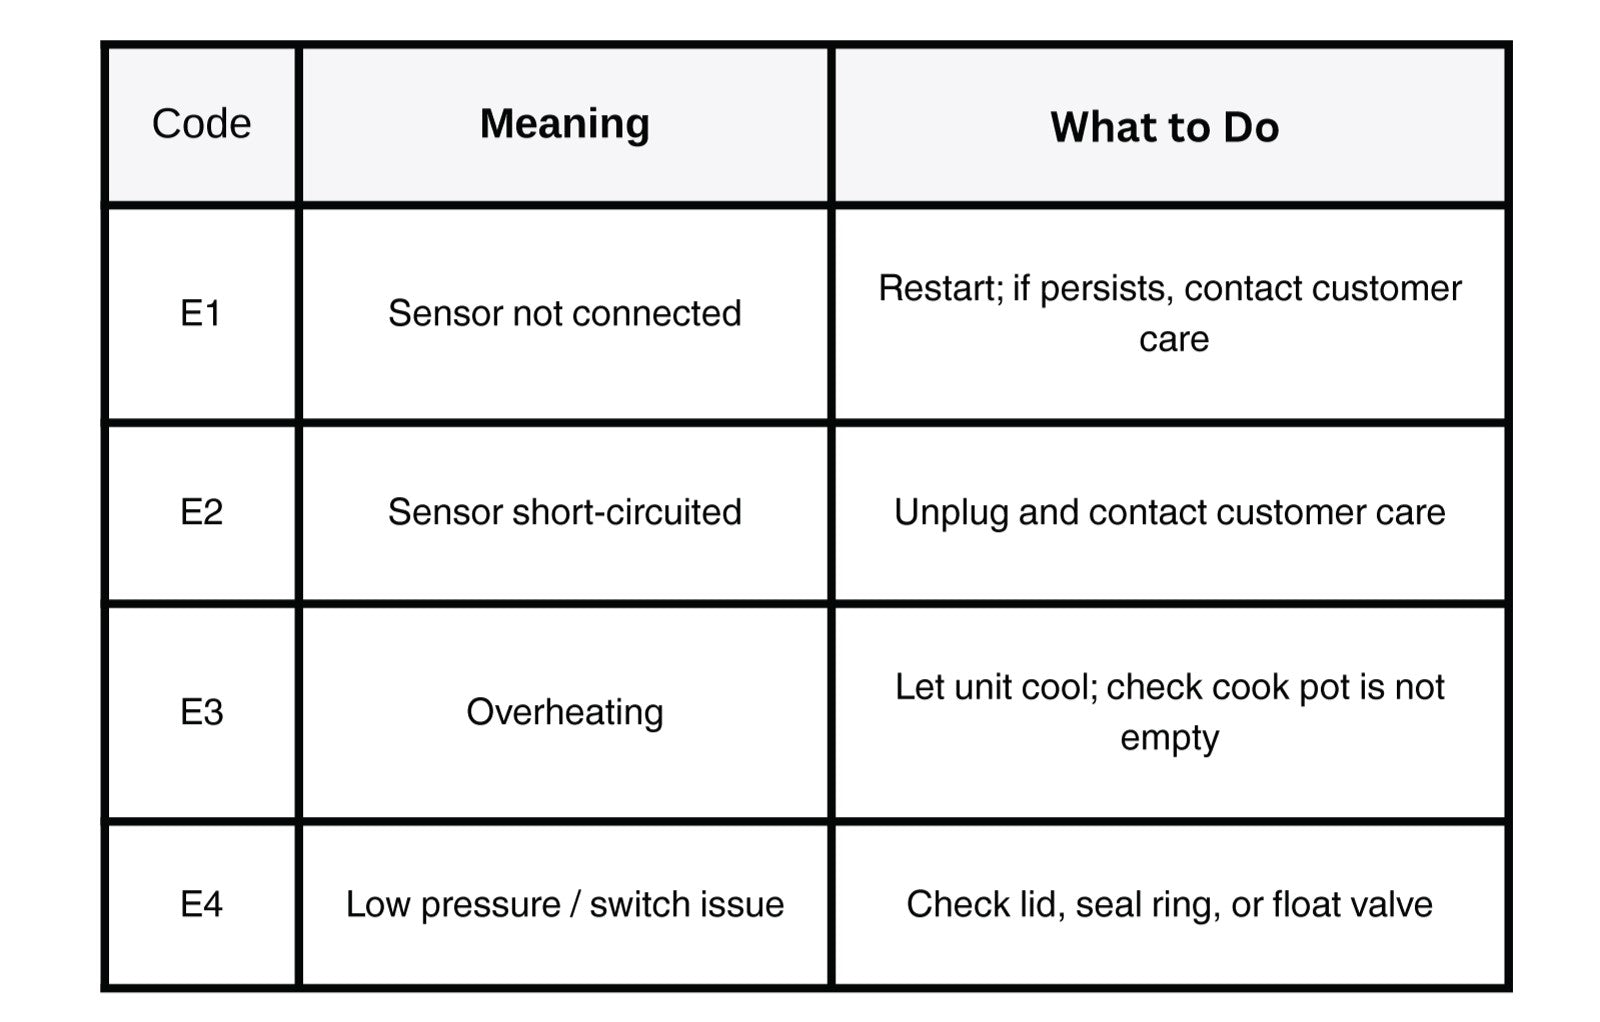
Troubleshooting & Error Codes
If your MultiCook isn’t working as expected, try the steps below before contacting customer care.
COMMON ISSUES

CONTROL PANEL OVERVIEW